
Stick drift is when a controller reports movement while nobody is touching the stick, so the camera turns or your character walks off by itself. It’s nearly always wear or dirt inside the stick, not a software fault. To fix stick drift, measure it first, then work through the free fixes in order: recalibrate, raise the dead zone, clean around the stick and update the firmware. If the drift survives all four, the stick needs replacing, and the maker’s repair or warranty route comes before a screwdriver. For Joy-Con bought in the UK, the EEA or Switzerland, Nintendo repairs drift free of charge.
What is stick drift?
A thumbstick should report zero when you let go of it. A drifting one doesn’t. It settles a little way off centre, and the controller tells the game the stick is still being pushed. People also call it joystick drift or controller drift. It’s the same fault, and it can hit either stick.
You usually notice it in a game first. The camera creeps sideways, a menu scrolls on its own, or your character keeps walking after you let go. It tends to start small, hidden by the game’s dead zone, and grow until it shows everywhere. If it happens in every game, suspect the controller. If it happens in one game only, check that game’s control settings first, because a remapped stick or a tiny dead zone looks exactly like drift.
How to tell it’s drift
Put the controller down on a flat surface and run the stick drift test. It reads each stick for five seconds while you keep your hands off, then asks you to turn each stick in full circles. A resting offset under 5% of the stick’s travel is Okay, 5 to 10% is Check this, and over 10% is Not working.

Write the number down. It tells you how big a dead zone would hide the drift, and it gives you something to compare after each fix below.

Know the test’s limits. It reads what your browser reports, and some systems filter out small movements, which can hide slight drift. The thresholds are starting values we’re still tuning. It runs in your browser, and nothing is stored or uploaded. If the controller doesn’t appear in the test at all, read controller not showing up first. While you’re at it, the gamepad tester checks every button and trigger, which is worth doing before a controller goes anywhere for repair.
What causes stick drift
Each stick measures its position on two axes, left to right and up and down. In most controllers, each axis is read by a potentiometer. A small metal contact, the wiper, slides along a curved resistive track as the stick moves, and the controller reads the resistance at that point. A spring pulls the stick back to the middle when you let go.

Every movement rubs the wiper across the track, and the wiper spends most of its life sitting on the same spot in the middle. Over hundreds of hours that spot wears, dust and skin get in, and the reading at rest no longer lands on the centre. A tired spring that doesn’t quite bring the stick home does the same, and so can a hard knock from a drop. Microsoft and Nintendo both describe drift from normal wear and tear on their own pages, which tells you how ordinary it is.
Hall effect sticks use a magnet and a sensor instead, so nothing rubs on a track. TMR (tunnel magnetoresistance) sticks also sense a magnet without contact; TDK, which makes these sensors, describes them as contactless and more sensitive. Neither design wears the way a potentiometer does. Neither is immune, though. A worn spring, a knock or a poor calibration can still leave the resting point off centre, so treat magnetic sticks as longer lasting, not drift proof.

What to do, in order
This is how to fix stick drift when it can be fixed without new parts. The first four steps cost nothing and can be undone. Run the stick drift test again after each one, so you know which one helped and don’t pay for a repair you didn’t need.
Recalibrate, where your system allows it
Free · undoableCalibration tells the controller where its centre is. It can pull back a centre that has wandered a little, but it can’t repair a worn track: if the drift returns within days, wear is the cause.
Pick your system
Nintendo Switch and Switch Lite: update the console first, then go to System Settings, Controllers and Sensors, Calibrate Control Sticks. Tilt the stick you want to calibrate fully in one direction for a few seconds, then follow the prompts. If the change doesn’t show straight away, Nintendo suggests putting the console to sleep and waking it, or pressing the controller’s SYNC button once and then any other button.
Nintendo Switch 2: System Settings, Controllers & Accessories, Calibrate Control Sticks, then the same steps. The same sleep or SYNC trick applies if the new calibration doesn’t take effect.
Xbox Wireless Controller: Microsoft’s Xbox Accessories app, on an Xbox console or a Windows PC, has a thumbstick recalibration tool that walks you through it. Microsoft says plainly that it can’t fix drift caused by normal wear and tear.
DualSense and DualShock 4: Sony’s support pages don’t offer a stick calibration step. Their first fix is a reset. Turn the console off, unplug the controller, then press and hold the button inside the small hole on the back for at least five seconds with a pin or a straightened paper clip. On a DualSense the hole is next to the Sony logo. Reconnect it with a USB cable and press the PS button.
Windows 11: press Windows key and R, type
joy.cpland open Properties for your controller. Some controllers offer a calibration step there; most current ones show only a test page. That page is still useful: if the crosshair sits off centre with your hands off, you’re looking at the drift.macOS: System Settings, Game Controllers remaps buttons. Apple doesn’t describe a stick calibration, so on a Mac the dead zone in step 2 is your tool.
Raise the dead zone
Free · undoableA dead zone is the small area around the centre that a game ignores. Many games let you change it in their control or accessibility settings, sometimes per stick. Set it just above the resting offset the test measured: if a stick rests 7% off centre, a dead zone of 8 to 10% hides it.
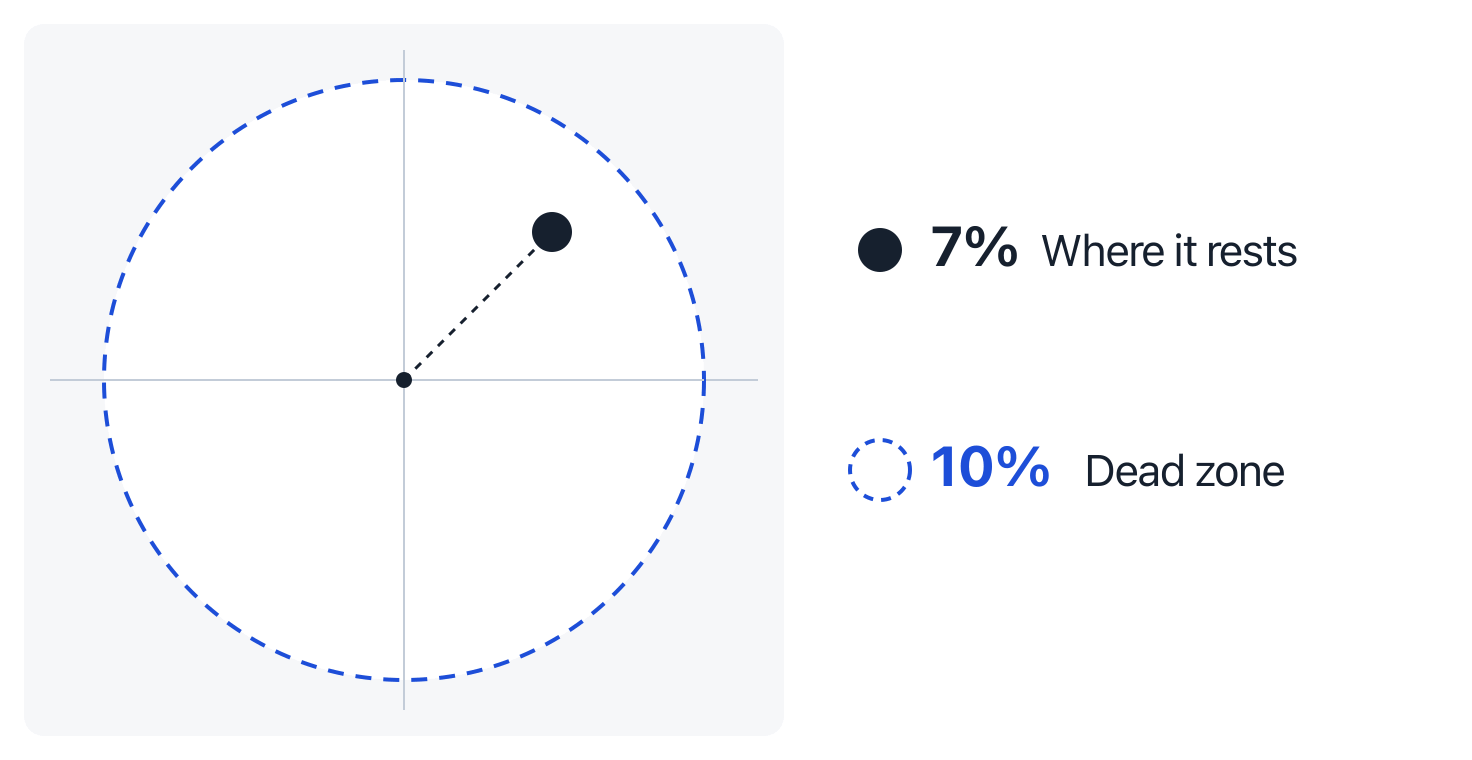
A stick that rests 7% off centre, inside a 10% dead zone. The game ignores everything inside the ring, so the drift no longer moves anything. The cost is a little fine control near the centre, which you notice most when aiming slowly. It’s a workaround, not a repair: the drift keeps growing underneath, and one day it will cross the line you set. For games you launch through Steam, see the section on PC below, because Steam can change the dead zone a game sees.
Clean around the stick
Free · undoableDisconnect the controller first. Nintendo’s advice for a stick that sticks is simple and safe for any controller: brush gently around the base of the stick with a clean, dry toothbrush, then wipe away the dirt with a soft, dry cloth. Take off any skin or cover, which Nintendo also lists as something to rule out, and calibrate again afterwards.
Be careful with anything stronger. None of the makers’ pages recommends spraying liquid or contact cleaner into a stick, and liquid that runs inside can reach the board. If you use compressed air, keep the can upright, use short bursts around the base and roll the stick as you go, because a tilted can spits cold liquid propellant. Cleaning the sensor itself means opening the controller, and that belongs in step 5.
Update the controller’s firmware
Free · undoablePick your system
Xbox: the Xbox Accessories app on an Xbox console or a Windows PC offers the update when one is due. If the app on a PC doesn’t list the controller over Bluetooth, plug it in with a cable that carries data and try again.
PlayStation: on a PS5, go to Settings, Accessories, Controller (General), DualSense Wireless Controller Device Software. On Windows 10 (64-bit) or Windows 11, Sony’s free PlayStation Accessories app updates the DualSense and DualSense Edge. Don’t turn the PC off or disconnect the controller during an update, and do one controller at a time.
Nintendo: update the console, then choose Update Controllers under System Settings, Controllers and Sensors (Switch) or Controllers & Accessories (Switch 2). The controller must be paired and switched on, and controllers update one at a time.
Replace the stick, repair or claim the warranty
Check your warranty firstIf the test still shows drift after all four, the stick needs replacing, because a worn track doesn’t grow back. Before you open anything, read the warranty section below and check whether the maker will fix it for you.
Opening a controller, or having it repaired elsewhere, can cost you that cover. On most controllers the stick is also soldered to the main board, so a home replacement means desoldering, which is easy to get wrong. The exception is the DualSense Edge, whose stick modules come out by hand. Out of warranty, it’s the maker’s paid repair, an official part where one is sold, or an independent repair shop. Run the stick drift test when the controller comes back, so you know the job was done.

Selling or returning the controller? Download the dated report at the end of the drift test. It shows what was measured in that session; a browser can’t read a serial number, so it isn’t proof about a specific device.
How to fix stick drift on a PS5 controller
PS5 controller drift is where the advice online is most muddled. Plenty of pages describe a stick calibration menu on the PS5, and they don’t agree on where it is. Sony’s own troubleshooting page for the DualSense, read in November 2026, lists a reset, a software update and then repair. It doesn’t mention calibration at all.
So for a standard DualSense, work through the reset, the update, the dead zone and the cleaning above, testing after each. If a stick still drifts, go to PlayStation Repairs (playstation.com/repairs) and choose the button or analog stick issue; it tells you what your country and warranty allow.
The DualSense Edge is different, because Sony made its sticks replaceable. Modules are sold separately, and the left and right ones fit either side. With the controller off and unplugged, slide the release latch on the back to take off the front cover, raise the release lever, swap the module and slide the new one along its grooves until it clicks. Lower the lever, click the cover back on and test the new stick.
How to fix Xbox controller drift
Xbox One and Xbox Series X|S controllers drift for the same reason, and the free fixes are the same. The difference is that Microsoft gives its Xbox Wireless Controllers a proper recalibration tool. Open the Xbox Accessories app on your console or PC, choose the controller and run the thumbstick recalibration; if your controller doesn’t offer it, go straight to the dead zone. When Microsoft launched it in February 2024 it said the tool is for minor problems, and that it can’t resolve drift due to normal wear and tear. That matches what you’ll see: a small offset often goes, a big one comes back.
Beyond that, Microsoft sells official replacement parts in its US store, for out-of-warranty accessories. On the standard controller the sticks sit on the main board, so the part you’d buy is the board. Microsoft’s service guides on Microsoft Learn list the tools, including TR8 Torx Security and T6 Torx drivers, and say to run the recalibration after fitting a new main board. If that sounds like more than you want to take on, it probably is.
How to fix Joy-Con and Switch Pro Controller drift
Joy-Con drift is common enough that Nintendo has a page about it. Beyond calibrating and updating, one check catches people out: a wrench icon on the controller in the Controllers screen means its buttons or sticks have been remapped, so set them back to standard while you test. Take off any skin or cover, then calibrate again. For a stiff or sticky Pro Controller stick, use the toothbrush and dry cloth from step 3. If none of it helps, the controller needs servicing. Send the controller, not the console.
Can you fix Joy-Con drift at home? Third-party replacement sticks exist, and people do fit them. If you bought your Joy-Con in the UK, the EEA or Switzerland, though, don’t: Nintendo repairs Joy-Con drift there for free, and opening it yourself is a reason it can refuse. In the US and Canada, Nintendo takes service requests online; elsewhere, contact your region’s authorised service centre.
Why your controller drifts on PC
A controller that seems fine on a console but drifts on a PC usually isn’t getting worse. The stick rests in the same place everywhere; what changes is the dead zone that hides it. Each game sets its own, and PC games vary more than most. The browser test, which shows the stick with no game in between, may also show drift that your console games quietly cover up.
Steam adds a layer of its own. For games you launch through it, Steam Input can apply a controller layout on top of the game. One of its joystick settings, Anti-Deadzone, is meant to cancel a game’s own dead zone so the stick feels less mushy. Valve’s documentation warns that with all the dead zone removed, every position causes input. If you or a community layout turned it up, a stick that rests 3% off centre will start moving things. Turn it down, or set Valve’s Anti-Deadzone Buffer, which acts as a new dead zone. To see whether Steam is the cause, quit Steam fully and run the drift test again.
Is stick drift covered by warranty?
Often, yes, if the controller is still in its warranty period and nobody has opened it. Each maker words it differently, so go by their page for your country rather than a forum post.
Nintendo is the most generous in Europe. For Joy-Con bought in the EEA, the UK or Switzerland, it says it won’t charge for drift repairs, whether the cause is a defect or wear and tear, even after its 24-month warranty has ended, until further notice. It can refuse if the drift came from accessories not made by or for Nintendo, if the controller was used for rental or commercial purposes, if someone other than Nintendo or its partners opened it, or if its serial number was removed. That page covers Joy-Con only. In the US and Canada, Nintendo controllers have a 12-month warranty from the date of purchase.
For PlayStation, start at PlayStation Repairs and pick the stick issue: it checks what your country’s terms allow. In the UK, Sony’s returns page refers to a 12-month guarantee, and a repaired or replaced product is guaranteed for three months or for what is left of the original 12 months, whichever is longer.
For Xbox, request service through Xbox Support (support.xbox.com) while the controller is in warranty. Microsoft’s official replacement parts are aimed at controllers whose warranty has ended, and its service guides warn that non-genuine, incompatible or modified parts can cause injury or damage.
What each system offers
| Where you play | Stick calibration | Firmware update |
|---|---|---|
| Xbox console | Xbox Accessories app | Xbox Accessories app |
| PS5 | Not in Sony’s support pages; reset button instead | Settings, Accessories |
| Switch and Switch 2 | System Settings, Calibrate Control Sticks | System Settings, Update Controllers |
| Windows 11 | Xbox Accessories app; joy.cpl for some controllers | Xbox Accessories or PlayStation Accessories app |
| macOS | None described by Apple | From the controller’s maker |
| Steam | None; dead zone settings in Steam Input instead | Use the maker’s app |
Questions
Can stick drift fix itself, or is it permanent?
Drift from dirt or a bad calibration can go away for good with the free fixes. Drift from wear doesn’t reverse. It can go quiet for a while after a recalibration, but if the test shows the offset creeping back over a few weeks, that stick is worn and needs replacing. A new stick, or a new main board on an Xbox controller, ends it.
Does stick drift affect aim?
Yes, if it’s bigger than the game’s dead zone. The game reads the drift as you nudging the stick, so your aim slides off target when you let go. Raising the dead zone stops the slide but costs some precision near the centre, which is exactly where slow aiming happens.
Why is my controller drifting up?
The direction only tells you which sensor has worn. Drift up or down comes from the up and down sensor, drift sideways from the left and right one, and a diagonal from both. The fixes are the same. If every controller you plug in drifts the same way on one computer, suspect the software, such as a Steam layout, rather than the sticks.
Is there a website that fixes stick drift?
No website can repair a worn part. A website can measure drift, which is what the stick drift test does. There are unofficial browser tools that write new calibration data to some PlayStation controllers. They aren’t Sony’s, they change the controller itself, and if something goes wrong you’re on your own, so think hard before using one on a controller that’s still in warranty.
Do Hall effect or TMR sticks stop drift?
They remove the part that usually causes it, the wiper rubbing on a track, so they should drift far less often. Any potentiometer stick will wear in the end; a magnetic one can still be knocked off centre or badly calibrated. Run the drift test on a new controller when you get it, so you know what normal looks like for yours.
Sources
Show all 21 sources
- Xbox Wire: Xbox February update (the thumbstick recalibration tool), read 19 November 2026
- Microsoft Learn: Xbox Series X|S controller repair instructions, read 19 November 2026
- Microsoft Learn: Xbox Elite Series 2 controller safety and repair instructions, read 19 November 2026
- Microsoft Store (US): Xbox repair and replacement parts, read 19 November 2026
- PlayStation Support: How to troubleshoot DualSense wireless controller issues, read 19 November 2026
- PlayStation Support: How to troubleshoot DualShock 4 wireless controller issues, read 19 November 2026
- PlayStation Support: DualSense wireless controller support and device software updates, read 19 November 2026
- PlayStation: PlayStation Accessories app for Windows, read 19 November 2026
- PlayStation Support: How to replace a stick module on your DualSense Edge wireless controller, read 19 November 2026
- PlayStation Support (UK): Return your PlayStation product for repair or replacement, read 19 November 2026
- Nintendo Support: How to calibrate the controllers on Nintendo Switch, read 19 November 2026
- Nintendo UK: How to calibrate the controllers on Nintendo Switch 2, read 19 November 2026
- Nintendo Support: How to update the controller firmware on Nintendo Switch, read 19 November 2026
- Nintendo Support: Joy-Con 2 control sticks are not responding or respond incorrectly, read 19 November 2026
- Nintendo UK: Control sticks are stuck or difficult to move on Nintendo Switch Pro Controller, read 19 November 2026
- Nintendo UK: Joy-Con control sticks are not responding or respond incorrectly (so-called drifting), read 19 November 2026
- Nintendo Support: Warranty and service information (US and Canada), read 19 November 2026
- Steamworks Documentation: Steam Input source modes (Anti-Deadzone), read 19 November 2026
- Apple Support: Connect a game controller to Mac, read 19 November 2026
- Microsoft Learn: Game controller testing prerequisites (joy.cpl), read 19 November 2026
- TDK InvenSense: TMR sensors, read 19 November 2026